
- Be confident at catch position
- Catch drill (back down to catch)
- Catch drill (catch itself)
- Catch drill (roll-ups)
- Catch drill (slow-mo connect)
- Drive drill (ABC)
- Five ‘Go To’ Front-end Drills
- Mark’s front end drills
- Release drill
Text (Videos coming soon)
- Rock-over & posture
- Skilful Feather and Square
- Left Hand Leading
- Taking the Hook catch
The important thing about drills
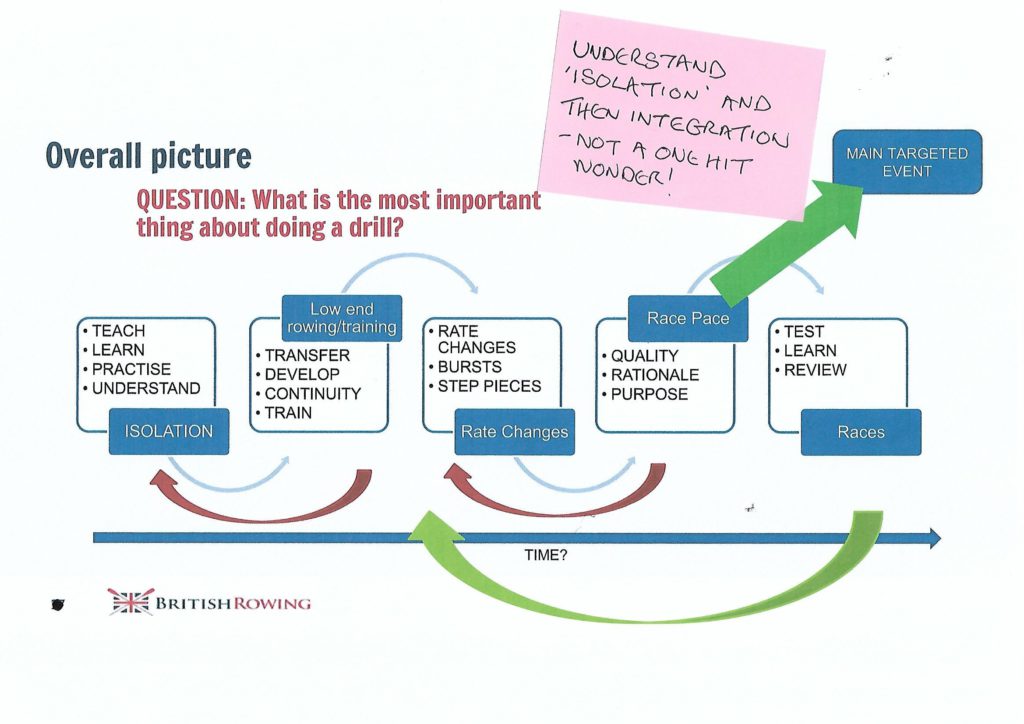
It’s a shame to see a sculler setting off for an outing, using the same old drill, sometimes executing the drill poorly, in a mindless way. It seems like a pointless ritual.
- So, firstly, select the drill carefully, and be clear on the PURPOSE. (For example a ROLL-UP to work on the ‘quiet catch’, un-weighting the blade, taking the catch instantly on arrival at the catch position). This is an ISOLATION drill … it’s impossible to work on too many things at once, so it’s striving for good technique in one part or aspect of the sculling cycle. Make sure you/the coach understand what good looks like.
- Completing the Isolation drill is pointless unless you then work hard to integrate that part/aspect into your sculling. At this stage in helps to attempt this TRANSFER into LOW END TRAINING For example: Long ‘steady state paddling’ (Rating 20, two-thirds pressure) This gives you time to think and to ‘stay in the now’ – observing what you are doing while you are doing it.
- If the transfer of stage 2 has gone well now is the time to challenge yourself to maintain the integration at higher rates and higher intensity – for example with UP 2, UP2 … rating increases, BUILDS to firm pressure BURSTS at race pace. Typically technique will start to break down at a certain points, with old ‘bad habits’ creeping back. The challenge is to gradually be able to maintain good technique at these HIGHER RATES and INTENSITY
- Come race day, and RACE PACE can the technique be maintained under the pressure of competition, and with the adrenalin flowing? Ideally the technique is so sound and practised, that it no longer requires conscious thought. It is INSTINCTIVE and NATURAL, freeing the mind to focus on the race strategy.
Be confident at catch position
Catch drill (back down to catch)
Catch drill (catch itself)
Catch drill (roll-ups)
Catch drill (slow-mo connect)
Drive drill (ABC)
Five ‘Go To’ Front-end Drills
Mark’s front end drills
To see the 5 drills, open the video. then go to Minute 35.15 to Minute 38.25
Release drill
Rock-over & posture
The sculler is too upright not achieving the rockover necessary for good length at the catch, or is too slumped, or rocks over only from the shoulders/upper back rather than from the hips.
- Sit in your single with your hands away, blades flat on the water. Sit up tall, on ‘the bones of your bum’, rock over with a straight back, hinging from the hips, till you feel your hamstrings stretch. Repeat 20 times, rocking forward and back.
- Now go for a paddle sculling, arms and body only, with the same rock over, sitting up tall, hinging from the hips feeling the hamstring stretch. This is helping you to ‘hold your knees down’. Do this for at least 30 strokes
- Continue paddling arms and body only, but now, when you feel the hamstring stretch, you can let you knees come up a little and take 4 inches of slide. Another 30 strokes
- Progress to ½ slide paddling. By the time you get to the ½ slide position you need to have achieved the rock-over required at the catch (15 degree lean, straight back, sitting up tall, eyes on the horizon) Another 30 strokes.
- Progress to full slide paddling. The secret now is to make a mental check that by half-slide you have achieved the rock-over, after this you just keep sliding into the catch holding the rock over position.
Skilful feather and square
I found this sketch from my old notebook from 6 years ago,
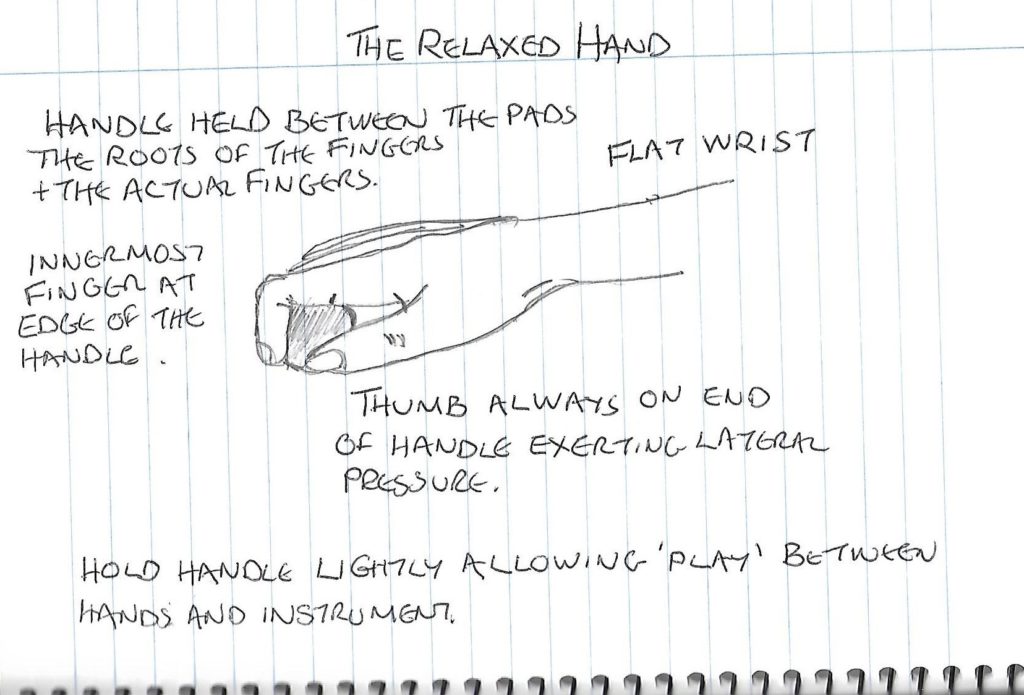
In the early stages of learning to single, the sculler is liable to grip the handles too tightly with a clumsy feather and square of the blades with excessive use of the wrists (sometimes unkindly described by coaches as “revving the motorbike”).
Learning to hold the handles’lightly’ is key. Initially the hands are positioned on the handles with the wrists flat, when the blades are square in the water. The thumb is at the end of the handle, exerting lateral pressure, the index finger is at the edge of the handle.
The subtle feather at the finish involves lateral pressure from the thumb pressing the collar against the gate while the fingers roll the handle back towards you to with minimal use of the wrist.
As you approach the catch it’s then simply a case of using the thumb and fingers to roll the handle back, with a light grip, so that you can feel the collar returning to the correct position in the gate with the blade perfectly squared.
So, day by day, you’ll be learning the more subtle use of the hands, particularly feathering and then squaring using, “… a little bit of thumb, a little bit of fingers, and a little bit of wrist.” (in the words of Charlotte Hollings of Calmwaters Rowing.) For a great video demonstrating and describing the detailed use of the hands Go to Links and the reference to the Calmwaters Rowing website. In their Rowing Videos view, “Recovery to Catch: How to Position your Hands and Hold your Oar“
In less than 5 minutes, Charlotte gives a very clear description of feathering, she also describes why, and how, to scull with left hand leading (rather than left hand over). If you’re still perfecting the use of the hands I’d watch this a few times, and try it out in your scull in between.
Left Hand Leading
Subtle use of the hands:- Re-cap
Re-cap feathering action – use of fingers (rolling towards you) thumb (allowing lateral pressure) together with minimal use of the wrist
Re-cap – the ‘relaxed hand’ – handles come into the fingers at the catch so you can ‘hang’ your weight off the handles
Last session (Hannah’s session) we practised the recovery, in order to have the blades off the water, straighten the fingers during the recovery then it just requires gentle pressure down from the palms to balance the boat perfectly coming forward. Start arms and body only, then half slide, paddling light, challenging yourself to control the balance, despite the lack of speed, with ‘soft hands’. Progress to full slide, low rating (16/18) with lots of control of the slide, ‘floating right out there’. Then 10 light, 10 half-pressure, 10 firm. Maintain the relaxation during the recovery.
LEARNING ‘LEFT HAND LEADING’
(See Penny Chuter’s series of articles on Row perfect explaining why we teach scullers to lead with the left hand in this Country and why left hand leading is preferable to left hand over. See attached longer explanation of the purpose of tonight’s drills)
5 STAGES
- Maintain the wrists “flat and neutral” on land or sculling simulatoar. Practice flat and neutral wrists feathering and squaring using “A little bit of thumb, a little bit of fingers, a little bit of wrist” On sculling simulatoar, or in the boat, on one side only, then on both sides at release.
- Sculling with Flat Wrists and Straight/Horizontal Fingers on the Recovery: After the extraction and as soon as the hands lead away from the body , uncurl the fingers of both hands, so that the fingers are pointing horizontally towards the stern of the boat. In order to do this, the wrists need to be flat & neutral. Keep the scull handles resting under the bridge of the fingers. Only curl the fingers round the scull handles as you square the blades ready for the catch. Do for 3 x strokes at first, then increase the repetitions as confidence and skill grows. This drill also teaches the sculler that you cannot “place” accurately and precisely if there is too much tension in the arms. The arms need to be “long and loose”.
- Sculling with Flat Wrists and Straight/Horizontal Fingers on the Recovery – Left-Hand Only: An extremely useful drill to ensure that, at the recovery cross-over, the hands are definitely leading-&-following, and not one-directly-above-the other. Execute the same exercise, but only uncurl the fingers of the left-hand. As the left-hand moves away from the body, uncurl the fingers and point them towards the stern of the boat, whilst keeping the fingers of the right-hand holding the scull in the normal way. The natural extension of the fingers, wrists and elbows will have the effect of making the left-hand lead away slightly faster than the right, so that at the cross-over, the left-hand will be clearly ahead of the right.
- Sculling with Hands Down the Loom: This exercise just involves sculling normally, including feathering, for a set number of strokes, alternated with sliding your hands off the grips & down on to the thicker part of the shaft. Initially move the hands just off the handles, and gradually increase the distance, until the hands are not more than half-way down to the collar. With the scull-handles free, the sculler can actually see the relationship between the two handles during both cross-overs, and they can ensure that the left-handle stays nearer the stern than the right handle on the cross-overs – (leading/following); they can also check that the handles remain very close.
- Scull with the Knuckles of the Underneath-hand touching the Wrist of the Top-hand, exactly where your Watch-strap would be: This drill ensures the correct position of the hands at the cross over. It can be used either during the recovery cross-overs, or the drive cross-overs.
Taking the ‘Hook’ Catch
These are aspects that contribute to an immediate and effective catch
- Float out there, with blades at least ½ blade width off the water
- So the hands can rise a little whilst unweight the blade for a ‘quiet’ catch
- Use thumb, fingers, to ‘roll’ the handle into the catch so there is no delay to the entry
- When the seat stops (momentarily) the hands must keep moving for good length and to create the hang
- Taking the ‘hook’ catch at furthest point of reach (blade moving bow-ward and down ward)
Drills progression
- Hook catch on 1 side (arms & body only); hook catch on both sides (ditto)
- Roll ups ( for instant ‘quiet’ catch); Take to half slide first progressing to full slide; Then roll-up followed by 1 – 2 – 3 perfect strokes. Hold up and repeat
- Back down to catch, blades stay in the water (for the ‘feel’ of patient connection to water and to create hang)
Now practice the whole thing:
- Arms and body only
- ¼ slide ( as soon as some slide is involved say SEAT to note the moment when the seat stops and HANDS to denote the hands keep moving for a split second
- ½ slide (ditto)
- Full slide (ditto)
Connection & hang can be practised more easily in a double scull with 1 sculler sitting the boat so that you have a stable platform.